Showing posts with label Crafting. Show all posts

Monday, June 26, 2017

Rolling with the Kayaks

One of the places we take the kayaks is Sherwood Lake in Greenbrier county, WV.
We spend a week up there in July, which gives us plenty of chances to get out on the water. The lake is a short walk through the woods from where we are camped. I don't like the idea of loading up the kayaks, driving over there, unloading....
sounded like an opportunity to DIY a kayak cart! 

I built these last year.


I wanted carts that could be taken apart if necessary.
So, a few plumbing parts, a 6 foot double female ended hose, 
some hardware, wheels, and PVC glue later and I had what I wanted. 


They can be disassembled by pulling cotter pins out of the axle, which will let you take the wheels off. Then unscrew the garden hose from the axle and store it away.


To use them we just slide the end of the kayak under the garden hose and on top of the axle, strap it down with a bungee cord across the top and connected to the axle. Attach another bungee from the top of the garden hose pulling toward the front, inside the seat or wherever.
Pick up the nose of the kayak and tow it away. 

The pink kayak was my first. I really liked the way it handled in the water, 
but I had a hard time getting in and out of it because the opening was pretty small.
The orange one below is my new ride. It doesn't handle as well in the river, 
but I can get in and out of it. 
This was taken after our Greenbrier ride on June 25th.


Making Kayak Sponges

Our first trip on a river with actual splashing water and 
a kayak with a larger seat opening proved one thing to us.
We need to be able to bail water out of there!
I looked online and found bilge pumps, but that seemed too simple.
I looked some more and found Kayak Bilge Sponges.
And most importantly, a DIY for how to make them myself.
I have grommets, a sewing machine, and something to tie them up with, so for another $10 in sponges and synthetic chamois, we have now got two kayak sponges.

I started with two sponges and a 3 foot square piece of damp chamois that I cut in two.
The chamois has to be damp or it is very hard to work with.

 I fitted the sponge to the chamois and then sewed up two sides.
Because the chamois was damp it didn't want to pull through the feed very well, but it worked.

I didn't get a picture of stuffing the sponge into its new home, but it was a hassle.
The damp chamois and the dry sponge wanted to stick together, but I finally got it right.
To get the open edge shaped the way I wanted it I clipped it right up to the edge of the sponge. 

I used the zipper foot on my sewing machine and made a double seam across the top.
Honestly, the first pass was too far away and I realized I could get closer with that zipper foot.
So then I had to make the other one the same way. 
Looks good though!
I added the grommets and had some cotton belts that worked perfect. 
That lets us tie them to something in the kayak in case they float away in the tail.
How did it work?
Great! This is after our last float (June 25th).
They survived and still look good. 

There really wasn't too much to get excited about though.
This is pretty much the most white water we saw.
None of us had ever floated that section before so it was an adventure.
If you are wondering, this was on the Greenbrier River.
The water was deep in some places and shallow, but floatable in others.
There were almost no rapids, just ripples.
We did hit some rocks and had to watch for them or get turned sideways.
FabHub got turned by a rock in one drop off and got pretty well swamped.
That was the only time we had to use the sponges.

For the record and because I am thinking about it:
June 25th, we put in from some private property below Alderson and got out at Talcott.
Alderson gauge was at 2.97.
Hilldale gauge was at 1.80.
Both considered Lower Runnable by the people who measure such things.
Us included.

When we run Fort Springs to Alderson we like the gauge to be between 3.5 - 4.0.
Our June 3rd trip in kayaks was 3.51. Splashy and fun.
We have done less than 3 (too shallow) and more than 4 (too fast) in river tubes. 
It was not fun for everyone either time.
More than 4 would be good with kayaks, but we haven't tried it yet.


Sunday, August 18, 2013

Corn Hole Crafting

A little back story to begin. Several years ago I decided to make teepee tents for the grand-niece and nephew. I got the fabric and cut everything out, but talked Mom into doing the sewing since I didn't have a machine. I thought (out loud it seems) about making some more at the time, so guess what Mom got me for Christmas that year? Yes, a sewing machine. Since that time, she has used it at my house for different projects we came up with three or four times. Me? I used it once I think, but never really knew how to set it up.

Jump forward to the current world and the corn hole fanatics (FabHub and his friend Jones) got the idea to build some boards. Actually, they want to build lots of them, so if you are interested and live nearby (shipping would be expensive), let us know. What is corn hole? A game where people throw bags of whole corn at boards that have a six inch round hole in them. The players get one point for landing a bag on the board and three points for dropping it through the hole. Kind of like horseshoes, but more versatile in location and a bit safer and easier for everyone to play.
These are some of the boards that the guys have built  They are set up at a picnic and ready for three different games to be played at the same time. Usually they play in the grass or on a gravel drive, but the driveway was more convenient this time.

Back to the sewing part of this story. Each team in the game has four corn bags. Because we can't do things the simple way around here, we decided to make the bags.

Ok, the truth is, we decided to volunteer MOM to make the bags.

I cut the pieces out of some old denim jeans and she agreed to do the sewing. Then they built another set of boards that we brought out to Kansas, and Mom sewed the bags for those at her house.

Then the guys decided to make a set of boards for the school and Jones gave his (without the bags) to some relatives so he needed new boards. The guys got together and built two more sets.

Luckily, since Jones still had his old corn bags, they only needed one more set for the school in black and red. And guess who got the chance to volunteer for that sewing part of the project? Yes, me, the one with the sewing machine. Lucky for us, Mrs. Jones has painting skills so that creative side of things is hers.

Since we used denim for the previous bags we wanted to do that for this set too. The problem is that I really doubted that I would find red denim so something would have to be dyed. So where does this all start? At the Walmart of course! I found some white jeans and a pair of blue on the clearance rack that would very likely take the red and black dye.


First thing was to cut our the seven inch squares.

Then the fun part started.
One pot of red dye cooking some denim.

After I had the colors done I hung them on a rack in the bathroom to dry.
If you notice the pieces all have some fringed edges of loose string. I had to trim all of that before I could sew them up because the strings kept sticking out the edges. Next time I will sew the bags up before I dye them.

After the fabric was ready I got the sewing machine out.

And the instruction manual. I read all of it. Filling a bobbin, threading the machine, speeds... all of it. Home Economics class came back - but very slowly.

I got all the pieces pinned together and got started.

And the result... corn hole bags!

Next up was the boards.
I don't have pictures of their development, but here they are.
They did a great job and the paint turned out pretty nice too.
Made of two by fours and plywood these things are solid.

Anyone ready for a game?


PS. I now have the "official" duck cloth fabric to use for the bags.

Sunday, July 15, 2012

Reece's Birth Announcement

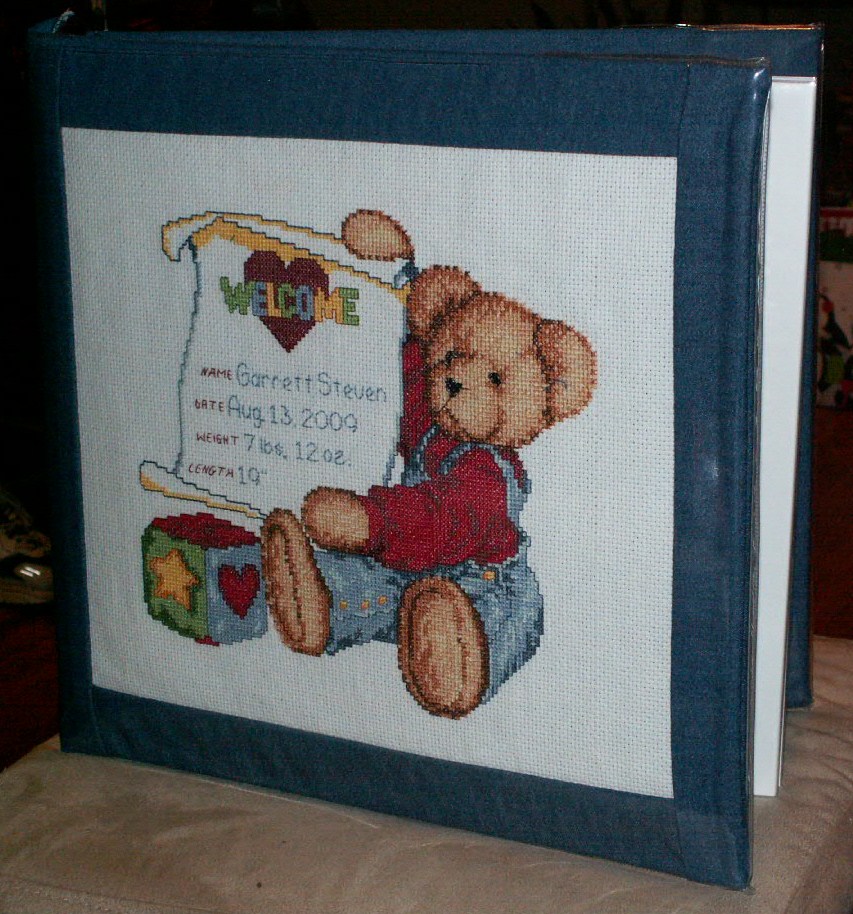
Back in 2009 my sister and her husband had a baby boy.
I made birth announcement for Garrett and have shown it here several times now.
Then in 2011 they had another boy!
So I made a birth announcement for Reece.

Luckily, my mom still had some of the denim she used to sew the cover for the first one. She happened to also have some fabric that matched the colors perfectly so that made a nice border. She had used the fabric to make a blanket for Reece too. I just noticed the same colors are in Garrett's album.
So everything matches. I like that.


I don't know if she has anymore fabric.
I also don't know if they are done with having kids.
I do know I can make another one.
Just in case.
That was why I started the first one.
Maybe I should start a girly version.

Friday, May 27, 2011

After the Trip Stiches

Well, the trip is over and I didn't get nearly as much done on my projects as I had hoped.
That must mean I was busy.
And that isn't a bad thing.

Sunday, May 01, 2011

Cross Stitch on Travel

Finally.
Two months ago I knew I would be traveling for business purposes.
Finally I have arrived at the destination.
Wish us luck on success for the work proposal.

Since I brought my craft stuff along to entertain myself in the hotel, I thought it would be a good idea to share the before pictures of my projects.
That way we can see how much I got done before I leave.
This is Faux Fabulous. Along with the toe, we now have a piece of foot and a knee.
I like working on this one, but it isn't the priority.
The priority is Baby2 Jackson's birth announcement for the photo album. 
It is coming along nicely.
I added some grass and finished the bunny today.
More to come.

Tuesday, March 22, 2011

Craft Updates

My Faux Fabulous project is growing a foot to go along with that toe.
This project is being done on 25 count Luguna 1 thread over 1 square.

My other project is this birth announcement for the new Jackson baby. 
I had a 50/50 shot on boy or girl when I started. 
Hence the flowers to go along with the soon to be cute animals.
Turns out there will be another boy in the house.
He will like it anyway. Or it will make him tougher.

Wednesday, March 09, 2011

Update on my Frog Project

I made a Faux Toe.
And have a long way to go.

Sunday, February 27, 2011

Crafting My Time

Yikes! Yes I need to use the daylight lamp when taking pictures.
This is the restart of the birth announcement for the second child of K and S. 
I didn't like the original fabric so I started over.
We should find out if this is for a niece or a nephew this week.
I can't wait!
This is my other project.
It is a Heaven and Earth Design called Faux Fabulous.
It isn't a full wall-to-wall design like a lot of the HAEDs, but there are 89 colors and it will probably take me eight years to finish.
Just kidding. I hope.
It will be fun, I like funky frogs.
I basted and marked some points of reference to get started.
I will be starting the project on March 1st with a group of other stitchers from all around the world.
We are all planning on starting similar large projects at the same time.
Internet groups are great!
I have discovered new ways of stitching, new inspiration for projects, and lots of new fun people.
This is one of my new things. 
An ORT jar. 
Old Ratty Tails
Why go to all of the trouble of making little piles of thread tails on the arm of your chair when you can have a cool ORT jar to put them in.
I don't know for sure where I got this one, might have been part of FabHub's stash when we got married, but now it has a purpose.
I plan on putting the strings out for the birds.
They should make some colorful nests.
That is my craft update for the now. Later.

Sunday, February 06, 2011

Starting the New Baby Gift

I finally got started on the Birth Announcement.
Can you tell what pattern it is yet?
I know, probably not and since this is a gift that is the secret for a while.
I am sure some of you CCS fans out there can see where I have already done some "frogging" (rip it, rip it out). I got started and then realized I needed to move the whole thing to the left five spaces.

The pattern is intended for 28 count Monaco 2 over 2. I had a package of 12x18 Charles Craft 22 count Hardanger in my stash and figured I could make it work. Then I did the graph on and realized the fabric was pretty small, but since I will be attaching another fabric to the edges anyway to make the album cover I don't need extra space for framing.
Then I got started and after the first section was done realized I had measured out 101 stitches instead of 111 and since my sides are so tight, I decided to move everything to the left a bit.

This is what I meant by album cover. I have shown it before, but I am really happy with it.
On this album I attached the pattern to a denim type fabric "pocket" that slides over an expandable photo album. I thought it might make a much longer lasting memento as it can be filled with pictures over time instead of just hanging on the wall.
So that is my project as of today. I will post updates and hope to be quick about it. July is coming soon!

Sunday, January 30, 2011

Back to Stitching

Back in 1992 I was in a craft shop with Mom and FabHub.
I wasn't really thrilled to be there.
I didn't DO crafts.
Then I found this counted cross stitch pattern of my favorite classic car.
I said "I can do that."
They laughed.
I said "No really, I can do that."
So they bought the pattern, fabric, and floss and said "Do it then."
And I did.
Then I went to the local needlework shop and found some more patterns that I liked.
And I did those.
Don't look too closely. They need to be cleaned.
All I did was finish and then wrap them up sometime between 1993 and 1994 or so.
Some of them were started and finished while I was stationed in Saudi Arabia during the Gulf War.
That didn't help with keeping them clean.

This one is called "Happy Together" doesn't it look like FabHub and me?
Ok, quit laughing. I am not blonde.

This one was meant to represent our farm.
It still does. I love it here.

This is from a series that Grandma Klein sent me. It is called Midwestern Barn.
There are more in the series. I should find them.


This one was absolutely done while in Saudi Arabia. 
I distinctly remember craft nights in the common room. 
One of the girls knitting or crocheting, another doing some embroidery, and me doing this CCS.

This one, I don't know why I did it. It turned out very nice though.

After I got out of the Air Force I also did a couple of Indian dream catchers. I gave them away as a Christmas present in '94 or '95. I haven't seen them again. They were nice though.

This is my latest purposeful start and finish.
Garrett's Birth Announcement
I bought it a few years ago with intentions of finishing it for my sister and her husband's first baby. 
They finally told me there was a due date and I had to hurry to finish it. 
They were on time. I was late. 
But at Christmas of 2009 Mom and I added the denim border and wrapped it around a photo album. 
It turned out really nice.
Guess what.
They are pregnant again.
I need to make another birth announcement.
Which has inspired me to finally complete a project that I started in late 1993.
And finished on 30 January 2011.
Completing it was originally inspired by FabHub's desire to have and hunt beagles.
We don't have or care for beagles anymore. They are kind of whinny.
The one in the picture is slightly modified to resemble my pup Wrinkles.
She was killed by a neighbor dog many years ago.
It was a really bad experience.

SO ANYWAY...
I just felt like I had to finish that one before I started anything else. 
I have a pattern to start for the new baby.
I also have a pattern coming from Heaven and Earth Designs.
Some day. 
It went to the printers several days ago and status finally changed to In Print.
So I am hoping tomorrow it will be shipped.
It is a full coverage picture. No backstitch. No partial stitches.
Hours and hours of work.
Once it gets here I will have to figure out what fabric I need and make sure I have all the colors.
Then I will have to find some fabric.
The local store doesn't carry what I think I will need.
I am sure they can order it, but the store is 25 miles away in a town I don't go to very often.
And if they are only going to carry the most basic and common fabric...
So, while I would like to support the local store, I will probably end up ordering online.
I have to get to sleep now. Our gym opens early in the morning and I have been procrastinating on that too.

Friday, January 02, 2009

A Project Deadline - Oh my

Over Christmas we found out that my sister and her husband have had some success at starting a project of their own. YAY! Congratulations are in order. Expected due date is August.
So I do have the request 6 months of notice on a project that I started a few years ago. In fact I posted a progress photo of this item in May of 2007.

If you look into my archive photos of that year, you will see I have made some progress since then.
Ok, not much, but you can tell what it is supposed to be, sort of anyway.
Well, I need to get this thing finished before our summer vacation to Iowa. There is a possibility that we might have to adjust that trip to Kansas, which will really mess up FabHub's plan to never return to that place, but things will turn out the way they should.
Later!

Sunday, May 20, 2007

Craft Time

In a return to the roots of this blog, pictures of things we have built or made, I decided to get a baseline for my current cross stitch projects. Since I am going to be here so long this time, I brought a couple of cross stitch patterns with me on this trip. I am showing the completion point as of today. I will hopefully be further along by the time I leave. Maybe with the goal of showing you some progress I will actually work on the pictures. I am a bit of a procrastinator on these things.

This first one is what I call the Birthday Bear. I started it in February 2007., minor procrastination at this point. It is one of those name/birth date/weight/length pictures. I hope to have a need for it one of these days.


This second picture provides a much clearer understanding of why I consider myself to be a procrastinator on these projects. It is a picture of a hunter with his beagle. I started this one while I was still in the Air Force. The date was sometime close to January 1994. I worked on it for a while during that summer after I moved to West Virginia. Then I put it away until sometime in 2005. Then I put it away again. We will see if I can get it done this year.

Wish me luck!