Monday, August 07, 2017

THE Cauliflower Pizza Recipe

Here it is! I know I have promised to share it for a while now, but we have been busy this summer!
Now that things have slowed down a bit I have a minute to put this blog together.


This is our favorite pizza crust. Not just because the others use processed flours as a crust, this crust is really very good. Being low carb and healthier is just a nice benefit and you can pick up slices!

The ingredients that I use for one dinner plate/personal sized pizza:
Approximately 5 ounces of cauliflower.
1 egg
1/4 cup of Parmesan cheese
1/4 cup of mozzarella cheese
Italian seasoning and extra garlic powder

I use a pizza stone to bake the crust at 425 degrees, for about 15 minutes, or until the cheese starts to brown. I think the stone helps make sure any additional moisture is removed. 

If using a pizza stone, make sure you preheat the oven so that the stone is definitely hot.

Then I add the toppings of choice and put under the broiler until the toppings are heated, typically, more browned cheese.

The entire process begins here:


I say approximately 5 oz. because I typically use frozen cauliflower rice products. They are sold in 10 or 12 oz. packages. I microwave them as the instructions say (usually 5 minutes) and then scoop out half of the "rice" for one pizza.

If I am using whole cauliflower, I rice a head in the processor and then will weight out the amount I want to use for each pizza. Then I microwave it for 5 minutes and use it just like the frozen kind. I use the remainder of the riced head as "fried rice" in a day or two.

What to do with that hot cauliflower.
The most important part of this recipe, is to get the excess water out of the cauliflower before mixing it in with the other ingredients. Other recipes I have seen say to put the cauliflower in a tea towel and twist it in order to wring out the excess water.

Two problems with that plan: 
1) Most dish towels are not the right thing to use.
I have the right towel for this, thin, light weight cotton.
I used the twisting process one time. I tore a hole in my towel.

2) The water coming out of that towel is hot! 
Unless you let the cauliflower cool, but that takes patience.

My solution:
A potato ricer!


Living on a farm of people who grow a lot of potatoes and in a home that used to actually eat them, I own a potato ricer. In case you didn't know, and still eat potatoes, a potato ricer is used to get the lumps out and make really creamy potatoes.

Now I use it to make pizza crust.

I line the ricer with cheese cloth and then spoon the cauliflower rice into the basket. Fold the excess cheese cloth over to cover the cauliflower and then squeeze the bejeebeez out of it using the handle press. No torn towels and no burned hands.


See that solid looking disc in the bowl below? That is what comes out of the cheese cloth. Excess moisture is no longer a problem.


Then I add it to the other ingredients that I mixed up beforehand to make sure the cheeses are coated with egg. 


I get everything all mixed up and then dump it out onto some parchment paper.


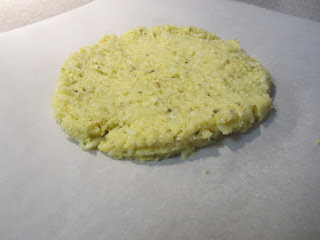
I flatten it out some to shape it and get the thickness pretty even. I have tried just pressing it out all the way at this point, but it doesn't work very well since it was sort of hard to keep the thickness even. So, instead, I use another piece of parchment paper on top of the mixture and am able to get it spread out thin and about the size of a dinner plate. If any adjustments to thickness need to be made it is easy to move the mix under the paper.


After it is spread out, pull off the top piece of parchment paper and trim off any extra parchment paper from around the edges of the crust. In an earlier baking adventure, I didn't trim the extra paper. The edges rolled up and during the final broiling process... caught on fire when it touched the element. So, now I trim the excess paper.


After the crust is baked I add sauce, pepperoni, banana peppers, and mozzarella. 
Put it under the broiler and... PIZZA!


If it is Monday, it must be pizza night!

Wednesday, July 26, 2017

Summer Project 2017 part 2 The Goat House

 Continuing the Summer of Painting Project

As shown in the last posting, I had an audience when I was painting the goat hay barn.
The next project was the goat house in this picture.

I tried to do something odd with this project and I pretty much succeeded. 
I wanted to make the building three-tones of pink. 
I did, sort of, but I won't try that again.
Even more odd, I started with the left over green paint from the hay barn.
I added the pink to it.

I also got out the paint sprayer.
I haven't done that again either. 
Painting did go much quicker.
Paint also went on much thicker.
Clean up took as long as the painting process.
Like I said, not doing that again, especially on a small building.

So, the pink added to the green is the lower dark band on the building.

Then I added another bucket of another shade of pink.
That is the middle lighter band in the above picture.

Then I added another bucket of another shade of pink.
That is the hot pink that took over the top layer and most of the door side.

I really didn't know how to use the sprayer and ended up brushing a lot of this just to get the paint spread around like it should have been. Then I would see a big drip in the wrong section and end up brushing a lot to get the color evened out. 
The door end and overhang are pretty high up too. I should have painted the rafters, but had made such a mess of everything with the sprayer I gave up on it. 

In the end. It looks sort of crazy, but it is painted, mostly.
Our niece (to be) saw the buildings and said they were Cosmo and Wanda.

I didn't know what that meant, but now I do.
She was right. HA!

There is one thing about it though.
Those buildings may be painted some crazy colors, 
but this is what I can see of them from my front porch.

They are over there, if you look really close. 
The nephews have a much better view than we do.
HA!


Summer Project 2017 part 1 The Goat Hay Barn

The summer of 2017 is turning out to be pretty productive around the farm.
Since we are both home everyday now until school starts again we decided to get some painting done on all of these farm buildings that FabHub has built over the years. 

FabHub and his brother decided to paint the big barns and I chose to paint our little ones.
I have collected colorful mistinted paint for years for various projects around the yard, but mostly I didn't care if it was interior or exterior, I just wanted color.

To do the barns we got more selective and wanted to go with only exterior paints.
The guys didn't care what color the paint was, they just wanted exterior paint that they could mix together and get some protection on the barns.

So, several months ago I started keeping an eye out for the mistints at Lowe's while I was working there. The problem was that it was winter time. Not much exterior painting going on when I started looking for it. That changed as we got closer to spring though.

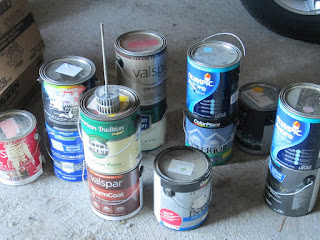
Some of these below are my really old acquisitions and some are more current.

For my first project I decided to do the goat hay barn.

There was a lot of variety in colors to choose from in my paint supply, but I decided that the greens would be a good place to start.

Can you believe it? $9 each?
This is some very good paint.


This is what I found when I opened the cans.

Dumped them all in the bucket and I got this.

Stirred it up and I got this.

Put it on the hay barn and I got this.

I had an audience. They are standing in front of the next project.
The Goat House.


Sunday, July 02, 2017

New River Pembroke to Bluff City 2 July 2017

We went out on the New River today. 
Water was 3.69 at Glen Lynn.
Flow was 3010 cfm.

Lots of class I and II rolling rapids and a few slow spots. 
Below is what happened after one of the really good class II runs.
Everybody had to dump the river out of their rides.

Just three of us today. There was a note on a kayaking site about not parking down by the water at Bluff City. I think the area has been cleaned up and is used a lot more now than when that was entered. I wouldn't worry about it next time.


Thursday, June 29, 2017

Below Alderson to Talcott 25 June 2017

The water was deep in some places and shallow, but floatable in others.
There were almost no rapids, just ripples.
We did hit some rocks and had to watch for them or get turned sideways.
FabHub got turned by a rock in one drop off and got pretty well swamped.
That was the only time we had to use the sponges.

For the record and because I am thinking about it:
June 25th, we put in from some private property below Alderson and got out at Talcott.
Alderson gauge was at 2.97.
Hilldale gauge was at 1.80.
Both considered Lower Runnable by the people who measure such things.
Us included.

When we run Fort Springs to Alderson we like the gauge to be between 3.5 - 4.0.
Our June 3rd trip in kayaks was 3.51. Splashy and fun.
We have done less than 3 (too shallow) and more than 4 (too fast) in river tubes. 
It was not fun for everyone either time.
More than 4 would be good with kayaks, but we haven't tried it yet.

Kayaking Without ME! Talcott to Willow Wood 29 June 2017

Today, (29 June, 2017) FabHub and friends went kayaking without me. I stayed home and cooked, shopped with Mom, mowed the lawn, and then cooked some more. Just saying.

They did the next section of the Greenbrier running from Talcott to Willow Wood.
The water at Alderson was 2.85 this morning and 2.81 this evening.
The water at Hilldale was 1.50 this evening.
So, very low, but runnable. It took them 7 hours.
IF the water was up they would have had better rapids and finished in about 5 hours.

They said it was fun, but rocky. The youngest said it was the best ride yet, but then she floats over top of stuff that the rest of us hit.

They also said it is important to stay to the right side.

And they took no pictures.

Monday, June 26, 2017

Rolling with the Kayaks

One of the places we take the kayaks is Sherwood Lake in Greenbrier county, WV.
We spend a week up there in July, which gives us plenty of chances to get out on the water. The lake is a short walk through the woods from where we are camped. I don't like the idea of loading up the kayaks, driving over there, unloading....
sounded like an opportunity to DIY a kayak cart! 

I built these last year.


I wanted carts that could be taken apart if necessary.
So, a few plumbing parts, a 6 foot double female ended hose, 
some hardware, wheels, and PVC glue later and I had what I wanted. 


They can be disassembled by pulling cotter pins out of the axle, which will let you take the wheels off. Then unscrew the garden hose from the axle and store it away.


To use them we just slide the end of the kayak under the garden hose and on top of the axle, strap it down with a bungee cord across the top and connected to the axle. Attach another bungee from the top of the garden hose pulling toward the front, inside the seat or wherever.
Pick up the nose of the kayak and tow it away. 

The pink kayak was my first. I really liked the way it handled in the water, 
but I had a hard time getting in and out of it because the opening was pretty small.
The orange one below is my new ride. It doesn't handle as well in the river, 
but I can get in and out of it. 
This was taken after our Greenbrier ride on June 25th.


Making Kayak Sponges

Our first trip on a river with actual splashing water and 
a kayak with a larger seat opening proved one thing to us.
We need to be able to bail water out of there!
I looked online and found bilge pumps, but that seemed too simple.
I looked some more and found Kayak Bilge Sponges.
And most importantly, a DIY for how to make them myself.
I have grommets, a sewing machine, and something to tie them up with, so for another $10 in sponges and synthetic chamois, we have now got two kayak sponges.

I started with two sponges and a 3 foot square piece of damp chamois that I cut in two.
The chamois has to be damp or it is very hard to work with.

 I fitted the sponge to the chamois and then sewed up two sides.
Because the chamois was damp it didn't want to pull through the feed very well, but it worked.

I didn't get a picture of stuffing the sponge into its new home, but it was a hassle.
The damp chamois and the dry sponge wanted to stick together, but I finally got it right.
To get the open edge shaped the way I wanted it I clipped it right up to the edge of the sponge. 

I used the zipper foot on my sewing machine and made a double seam across the top.
Honestly, the first pass was too far away and I realized I could get closer with that zipper foot.
So then I had to make the other one the same way. 
Looks good though!
I added the grommets and had some cotton belts that worked perfect. 
That lets us tie them to something in the kayak in case they float away in the tail.
How did it work?
Great! This is after our last float (June 25th).
They survived and still look good. 

There really wasn't too much to get excited about though.
This is pretty much the most white water we saw.
None of us had ever floated that section before so it was an adventure.
If you are wondering, this was on the Greenbrier River.
The water was deep in some places and shallow, but floatable in others.
There were almost no rapids, just ripples.
We did hit some rocks and had to watch for them or get turned sideways.
FabHub got turned by a rock in one drop off and got pretty well swamped.
That was the only time we had to use the sponges.

For the record and because I am thinking about it:
June 25th, we put in from some private property below Alderson and got out at Talcott.
Alderson gauge was at 2.97.
Hilldale gauge was at 1.80.
Both considered Lower Runnable by the people who measure such things.
Us included.

When we run Fort Springs to Alderson we like the gauge to be between 3.5 - 4.0.
Our June 3rd trip in kayaks was 3.51. Splashy and fun.
We have done less than 3 (too shallow) and more than 4 (too fast) in river tubes. 
It was not fun for everyone either time.
More than 4 would be good with kayaks, but we haven't tried it yet.