Saturday, October 19, 2013

Pumpkin Crescent Puffs

I have seen the basics of these puffs listed on lots of web sites, Pillsbury and Kraft included, they both called them Magic Marshmallow Crescent Puffs. One highlighted their brand product the other highlighted their brand product. Plenty of other places also listed these same ingredients and instructions - but nothing exactly like I made. So I am sharing with you.

I got the puff recipe from here:
And the filling recipe from here:
(The cream puff recipe on this site are pretty good too.)

Whatever they call them and whoever they belong to - I call them: 

Pumpkin Crescent Puffs
The Puffs - 

2
cans  (8 oz. each) refrigerated crescent dinner rolls

1/4
cup  sugar

1
tsp.  ground cinnamon

1/4
cup  (1/2 stick) margarine or butter, melted

16
Large Marshmallows

PREHEAT oven heat to 350°F. Separate dough into 16 triangles. Mix sugar and cinnamon; set aside.


 DIP marshmallows in margarine, then in sugar mixture, turning to evenly coat all sides.

 Wrap each dough triangle around 1 marshmallow, 

Completely covering marshmallow; pinch edges of dough tightly to seal. Dip sealed side in margarine; place, sealed side down, in each of 16 greased medium muffin cups.

 BAKE 10 to 15 min. or until golden brown. Immediately remove from pan.

Unfortunately, I don't have a picture of the stuffed puffs, but the Gunny Sack website above does. 

The cream filling:
3/4 cup heavy cream 
1/4 cup pumpkin puree 
2 teaspoons pumpkin pie spice 
1/4 cup sugar (they used maple syrup)
1 teaspoon real vanilla extract
In mixing bowl or stand mixer, combine cream, sugar, vanilla, and spice 
Whip until it forms stiff peaks 
Fold 1/4 cup of pumpkin into whipped cream 
Stuff your puffs by generously filling the cream puff shell with the pumpkin mixture
That is it - they were quite tasty.

Ready for Winter 2013

One wood shed, double stuffed.

Jake is kind of not interested at this point.
He will like the heat later on though.

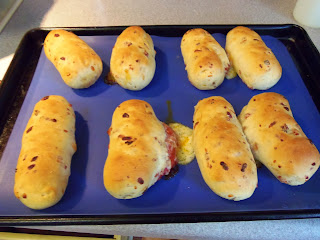
Pepperoni Rolls

I think I made these before and probably posted it back then too, but they are pretty good.
So I will post it again.
The full recipe comes from Suzane McMinn at Chickens in the Road.

The time my dough has pieces of bacon, garlic, and shredded mozzarella in it.
mmmm bacon
Roll out the dough and sprinkle with more mozzarella and some pepperoni.
Wonder why the shapes are so different.

Bake them for a while.
Feel bad about erupted rolls.
Let them cool some.
Tear one open and add some sauce. 
Enjoy.

Monday, September 23, 2013

The Egg Mystery Solved

I have 7 chickens.
2 Yellow Buff Orpington - Thelma and Louise
2 Rhode Island Red -Reba and Dolly
2 Black Australorp - Mable and Mavis
1 White Delaware - Edna

Why am I getting only 2 -3 eggs a day? Some of the girls may not be laying, but I was getting 4 or 5 a day. I know it is getting dark sooner, but another website expects that her young birds will continue laying just because they are young. So where are my eggs? I have checked some of the places that they spend time, but haven't found anything. 
Then I went to the garden  to get some overgrown kohlrabi to see if they or the goats will eat it. Somebody needs to.

Of course you can tell by now what I found. 
26 eggs.
Twenty-six eggs.

With no idea how old they are I sent them all to the pigs. 
And while I was picking them up I also found Black feathers.

I think I now know why I have never seen Mable or Mavis in the nest boxes. I haven't seen Thelma or Louise in there either by the way. So - I will check the spot daily to see if it is still going on and try to keep an eye on who is heading that way. That should be easier when I start painting their building this week. 
If they are still laying in the garden I will lock them all up in their yard in an attempt to get them in the nest boxes. I have seen that Reba is sort of bossy and might be chasing them out of the house, but there are four nest boxes to choose from so they will have to get it together. I mean really, they could have it worse!

Sunday, September 22, 2013

Croissoughnuts First Try

I decided to give the CroNut craze a try out here on the farm.

Don't they look wonderful?!
Total disclosure, I made some mistakes, but it was an adventure.

I used a recipe from the Dinner with Julie website, which I will include, 
just in case any of you get inspired to give this a try too. 

My first thought here was "Wow, anything with this much butter will have to be tasty!"

Then after the first fold I realized I should have done that differently. 
I could have unfolded and done it right, but I am stubborn. What happened was - after I refrigerated the dough and came back for the second roll and fold (turn) the butter started squishing out the edges and got pretty messy.
I should have skimmed that first layer with butter, refrigerated, and then after rolling it out the second time, skimmed that layer with more of the butter, and then the same for the third and fourth turns also.
It would have probably made the layers more flaky. I also used bread flour when the recipe says to use all-purpose.

But hey it rolled out pretty nice after I got the mess under control. The recipe says 30 minutes of chilling time, but I think 45 minutes worked better. It does take more rolling out muscle and probably one of those rolling pins that don't have a handle. I was concerned about bending the handle with all the force needed to roll out cold dough.
This is the last rolling before I cut out the croissoughnuts.

The layers are visible.

Into the fryer and rolled over. 
This oil left sort of an after taste. I think it was the oil anyway. I am going to try something different next time.
I don't even know for sure what kind of oil I have in the cupboard it is either vegetable or canola. I will try the other one I think.

The end product of the first attempt.
Yes I fried up all the holes and bits too.
Can't waste anything!
So that was the first attempt.
I will try again.

Tuesday, September 10, 2013

The Watermelon of BRSK Farm

What is bigger than a loaf of bread?

Taller than a jar of jelly, a paper towel roll, a knife block, and a spatula?

What intimidates a basketball?

What makes a farmer work on an uphill pull?

What stresses the scale to beyond its 70 pound limit?

The Monster Watermelon!

After defeating the Monster....
..we found it is tasty, put a bit pale.

Since it really did bottom out that 70 pound scale,
we wanted to know how much it might really weigh.

The half weight weigh in was
40 pounds! 
At an estimate 80 pounds total, that was one giant melon! 

And the chickens say... 
Bring on the Rind!!!
They will eat this down to paper thin. No really, they will.
It is amazing.

Sunday, August 18, 2013

Corn Hole Crafting

A little back story to begin. Several years ago I decided to make teepee tents for the grand-niece and nephew. I got the fabric and cut everything out, but talked Mom into doing the sewing since I didn't have a machine. I thought (out loud it seems) about making some more at the time, so guess what Mom got me for Christmas that year? Yes, a sewing machine. Since that time, she has used it at my house for different projects we came up with three or four times. Me? I used it once I think, but never really knew how to set it up.

Jump forward to the current world and the corn hole fanatics (FabHub and his friend Jones) got the idea to build some boards. Actually, they want to build lots of them, so if you are interested and live nearby (shipping would be expensive), let us know. What is corn hole? A game where people throw bags of whole corn at boards that have a six inch round hole in them. The players get one point for landing a bag on the board and three points for dropping it through the hole. Kind of like horseshoes, but more versatile in location and a bit safer and easier for everyone to play.
These are some of the boards that the guys have built  They are set up at a picnic and ready for three different games to be played at the same time. Usually they play in the grass or on a gravel drive, but the driveway was more convenient this time.

Back to the sewing part of this story. Each team in the game has four corn bags. Because we can't do things the simple way around here, we decided to make the bags.

Ok, the truth is, we decided to volunteer MOM to make the bags.

I cut the pieces out of some old denim jeans and she agreed to do the sewing. Then they built another set of boards that we brought out to Kansas, and Mom sewed the bags for those at her house.

Then the guys decided to make a set of boards for the school and Jones gave his (without the bags) to some relatives so he needed new boards. The guys got together and built two more sets.

Luckily, since Jones still had his old corn bags, they only needed one more set for the school in black and red. And guess who got the chance to volunteer for that sewing part of the project? Yes, me, the one with the sewing machine. Lucky for us, Mrs. Jones has painting skills so that creative side of things is hers.

Since we used denim for the previous bags we wanted to do that for this set too. The problem is that I really doubted that I would find red denim so something would have to be dyed. So where does this all start? At the Walmart of course! I found some white jeans and a pair of blue on the clearance rack that would very likely take the red and black dye.


First thing was to cut our the seven inch squares.

Then the fun part started.
One pot of red dye cooking some denim.

After I had the colors done I hung them on a rack in the bathroom to dry.
If you notice the pieces all have some fringed edges of loose string. I had to trim all of that before I could sew them up because the strings kept sticking out the edges. Next time I will sew the bags up before I dye them.

After the fabric was ready I got the sewing machine out.

And the instruction manual. I read all of it. Filling a bobbin, threading the machine, speeds... all of it. Home Economics class came back - but very slowly.

I got all the pieces pinned together and got started.

And the result... corn hole bags!

Next up was the boards.
I don't have pictures of their development, but here they are.
They did a great job and the paint turned out pretty nice too.
Made of two by fours and plywood these things are solid.

Anyone ready for a game?


PS. I now have the "official" duck cloth fabric to use for the bags.

Friday, August 16, 2013

Changes in the Chicken World

The new next boxes are getting used every day now. 
A bit too much, but that story will come later.
Mabel wasn't to excited to see me peeking in.

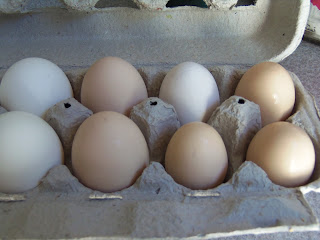
I have read that as the hens get older the eggs will get bigger and more frequent. In the egg carton below, the two white eggs on the left are from the grocery. The next two are from one of the hens that I think is laying every day now. She has probably maxed out the size and I expect another one today.
The other four eggs - those were collected over three days so I don't know how many girls are laying at the moment. Probably just the two black birds and the white one though.

Do you see the white one in the middle?
That is a curiosity.

None of the hens "should" normally lay white eggs.
Their mothers were Black Australorp or Jersey Giant, Orpington, and Delaware.
 BUT their daddy is a Lakenvelder, who's hens do lay white eggs.
So, the possibility does exist that they could all lay white eggs, but it looks like just one of them will.

I am just guessing because of her color, but I think the white egg layer might be Edna.
Lakenvelder and Delaware chickens are both white and black.
According to my reading, Delawares are big birds and Lakenvelders are smaller.
Edna is kind of small compared to everybody else and that egg is kind of small.
So who knows! I plan to be out in the yard quite a bit this weekend. When I hear the triumphant "I have just laid an egg!" hollering from the coop I will try to get over there and see who comes strolling out the door. The first time I heard that racket I thought something was attacking them.

On another note. I have talked about getting two red chickens to add some more color to my little flock of birds. I decided to wait because five seemed like a good number. They all fit on the roost that I made and everybody seemed pretty happy. Then the neighbor stopped by a couple nights ago to return a piece of equipment he had borrowed. In thanks he brought two Rhode Island Reds for me! They are about the same age as mine so their size will help them fit in to the group.
I don't know if he has too many hens, there are 40 or so, but he sure seems to have a few roosters! We can hear at least one of them through the woods and the girls' backs are missing a bunch of feathers, which means the boys were pretty active. I left everybody locked up yesterday so that the new girls would know where the house is and get to know the others. I think their size and their being two of them helped hold off the pecking order fights for the day. They aren't mixing in with the group too much yet, but there weren't any pulled feathers laying around when I got home.
I do need to redo the roost today though. seven do not fit. When I peeked in the window last night I saw one of the hens had decided to sleep in a nest box and that is a habit I need to stop quickly. So, now I have seven chickens. Soon I will have just six goats. Moderation is the key to fun with animals. If you want to make money you need volume. I want to enjoy my farm.

Tuesday, July 23, 2013

The Girls are waiting to give you a tour of their remodeled house.

One of FabHub's summer projects was to add all the lap siding once they got the wood off the saw mill. Since it is not good to paint fresh cut wood, my fall project will be to paint it and the goat house. We will see how that goes. 

Inside the door is a two tiered roost made from recycled tomato cage wood.
They sleep on the top perch, which is good because the angle is a bit short making the lower perch right in the line of fire for droppings from the top. They use it as a step though so all is good. Underneath the roost is this weeks grass clipping collection. I mow, sweep up the clippings, use some as mulch in the garden, and the rest under the roost. Each week I collect the old grass and put it on the compost pile. This winter I will use sawdust the same way.

Their food and water are positioned near the window at the moment.
The nest boxes aren't in yet, but will be on the wall to the right.

The chicken door into the run.
I really appreciate the rope system.
On my way to work in the morning I stop and pull the door up from the driveway. After the chickens have gone to bed at night, about 9 pm these days, I come out and lower the door. That is much better than having to open the gate and go in the yard. Besides the wet grass, there are too many things that a person could step into in that goat, cow, chicken lot.

This is the run. Plenty of room for five hens.
Another of FabHub's projects was to finish the wire cover for it so that they can't get out while we are on vacation. The black cloth is commercial grade weed block. I had initially put some up over on the right side to try and give the 15 original birds some shade. It worked, but ended up ripping when the wind caught it or the chickens got up there walking around. The new piece in front of the building is sandwiched between two sections of wire to protect it.

It does the job pretty well.
Late in the afternoon the chickens like to go under the building before they head to bed. The shade helps keep that space from heating up. I am going to add a roost under the shade cloth for them too. That way they will have a shady place to sit during the day while we are gone. My plans for a rain gutter seem to have gotten "lost" in the details. I guess they can't have everything.

So that is the end of the tour. 
I will share the roost and hen boxes when they get done. The hens will start laying eggs when they are about 18 weeks old and that is on the first of August so we will get it done when we get back from our road trip.